LESSON 3: Sight, "Impressions of Place" Frottage Prints- Ink rubbings with stencils and found textures
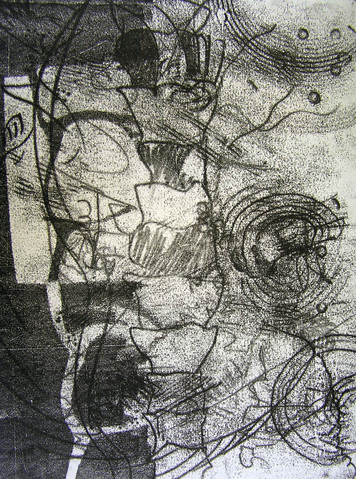
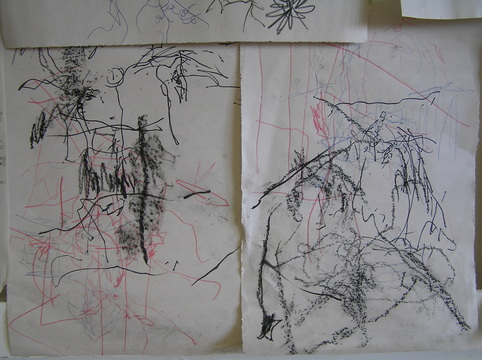
Karissa Ferrell, Spinal Bound, frottage, 2011
 |
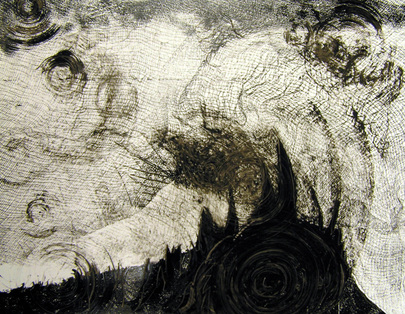
Karissa Ferrell, Great Gauze, frottage on yupo paper, 2011
 |
Description:
This lesson will direct students through an immediate and spontaneous reaction to the “place” around them. Students will create a series of “preparatory sketches” following a variety of instructions intended to get them out of their preconceived notions of landscape drawing. Students will work collaboratively using the preparatory sketches as the bases for a small series of black and white frottage monoprints.
Objectives:
Artists' Examples of “Impressions of Place”
- Claude Monet, Impression Sunrise, Rouen Cathedral
- Vincent Van Gogh, Starry Night, Starry Night over the Rhine
- James Whisler, Nocturn in Blue and Silver, Nocturn in Blue and Gold
- L. Canfield, Laura, Sue W, Carolyn Hill: http://summerprintmaking.blogspot.com/search/label/Frottage
- Kevin Mesilone, Spontaneous Landscape
Defining Terms:
Frottage- a technique in the visual arts of obtaining textural effects or images by rubbing lead, chalk, charcoal, etc., over paper laid on a
granular or relief-like surface.
Impressionistic- a.) a style of painting developed in the last third of the 19th century, characterized chiefly by short brush strokes of
bright colors in immediate juxtaposition to represent the effect of light on objects. b.) a manner of painting in which the forms,
colors, or tones of an object are lightly and rapidly indicated. c.) a theory and practice in literature that emphasizes immediate
aspects of objects or actions without attention to details. d.) a late-19th-century and early-20th-century style of musical
composition in which lush harmonies, subtle rhythms, and unusual tonal colors are used to evoke moods and impressions.
Spontaneous- coming or resulting from a natural impulse or tendency; without effort or premeditation; natural and unconstrained;
unplanned.
Line Variations and Qualities: How line can be expressive
-Location (placement on the page)
-Direction (movement)
-Measure (length, width)
-Type (curvy, angular, zig-zag, straight…)
- Quality ( darkness, thickness, fragility, purpose, reflections of the material used, personal attributes, etc.)
-Elements of chance: dropping the tool, using it in a new way -on the side, eraser side, rolling it, etc.
Space- the unlimited or incalculably great three-dimensional realm or expanse in which all material objects are located and all events
occur. Space has to do with the illusion of depth on a two-dimensional surface.
Movement- A governing principle of design that The artist can use to create a trail, a pathway or serve as a bridge from one area to the
other, creating a sense of flow and order to the design. Determines how and where the viewer moves their eye (usually along directional lines which help the viewer prioritize what is important.
Materials and Preparations:
(Drawing Materials)
Procedures: (5 days)
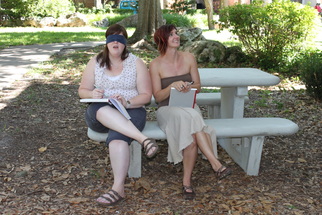
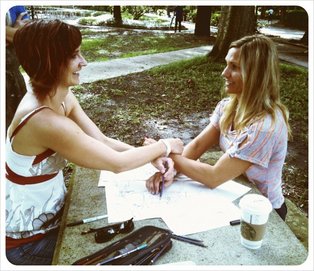
(DAY 1) Prepratory Exercises: “Walk the Line,” “Blind Partner Drawing,” “Bound Partner Drawing”
Guiding Questions may include:
- What was your experience of each exercise, how did you feel doing each activity?
- How were these exercises different from your previous experiences with landscape or observational drawing?
- What did you learn through doing these exercises?
- Why do you thing your teacher hoped you would learn, what was the purpose of these exercises?
Instructions for “Blind Partner Drawing”
This lesson will direct students through an immediate and spontaneous reaction to the “place” around them. Students will create a series of “preparatory sketches” following a variety of instructions intended to get them out of their preconceived notions of landscape drawing. Students will work collaboratively using the preparatory sketches as the bases for a small series of black and white frottage monoprints.
Objectives:
- Students will let go of previous fears and preconceived notions of landscape drawing and begin to “play with purpose.”
- Students will experience a new relationship with observation and observational drawing based on the quick and spontaneous record of a visual impression.
- Students will understand the process and techniques used by the Impressionist painters; and draw on this understanding while creating their own works.
- Students will learn various frottage monoprinting techniques.
Artists' Examples of “Impressions of Place”
- Claude Monet, Impression Sunrise, Rouen Cathedral
- Vincent Van Gogh, Starry Night, Starry Night over the Rhine
- James Whisler, Nocturn in Blue and Silver, Nocturn in Blue and Gold
- L. Canfield, Laura, Sue W, Carolyn Hill: http://summerprintmaking.blogspot.com/search/label/Frottage
- Kevin Mesilone, Spontaneous Landscape
Defining Terms:
Frottage- a technique in the visual arts of obtaining textural effects or images by rubbing lead, chalk, charcoal, etc., over paper laid on a
granular or relief-like surface.
Impressionistic- a.) a style of painting developed in the last third of the 19th century, characterized chiefly by short brush strokes of
bright colors in immediate juxtaposition to represent the effect of light on objects. b.) a manner of painting in which the forms,
colors, or tones of an object are lightly and rapidly indicated. c.) a theory and practice in literature that emphasizes immediate
aspects of objects or actions without attention to details. d.) a late-19th-century and early-20th-century style of musical
composition in which lush harmonies, subtle rhythms, and unusual tonal colors are used to evoke moods and impressions.
Spontaneous- coming or resulting from a natural impulse or tendency; without effort or premeditation; natural and unconstrained;
unplanned.
Line Variations and Qualities: How line can be expressive
-Location (placement on the page)
-Direction (movement)
-Measure (length, width)
-Type (curvy, angular, zig-zag, straight…)
- Quality ( darkness, thickness, fragility, purpose, reflections of the material used, personal attributes, etc.)
-Elements of chance: dropping the tool, using it in a new way -on the side, eraser side, rolling it, etc.
Space- the unlimited or incalculably great three-dimensional realm or expanse in which all material objects are located and all events
occur. Space has to do with the illusion of depth on a two-dimensional surface.
Movement- A governing principle of design that The artist can use to create a trail, a pathway or serve as a bridge from one area to the
other, creating a sense of flow and order to the design. Determines how and where the viewer moves their eye (usually along directional lines which help the viewer prioritize what is important.
Materials and Preparations:
(Drawing Materials)
- Newsprint
- Cardboard drawing boards
- Masking tape
- Charcoal, pencils, colored pencils, graphite sticks
- Strips of cloth for blindfold and arm ties (1 per pair)
- Rives BFK (torn to an appropriate size 2-4 pieces per student)
- Tear bar or book binding tear tool
- Drawing tools and sharpeners
- Matt knife
- Newsprint
- Wax paper (for layering and also cutting stencil shapes)
- Masking Tape
- Yupo paper (cut to size 2 per student)
- Bone or Vine black litho ink mixed to thick honey consistency with linseed varnish (Graphic Chemicals & Ink)
- Metal ink knife
- Brayers
- Baren- or hard surface for rubbing
- Objects for non-visible mark making (comb, fingers, keys, pen lids, etc.)
- Gum arabic
- Talk powder
- Water bowls and sponges
- Aluminum foil (to save remaining ink)
- Ink scrapers
- Phone book (for wiping tools, brayers, and desks)
- Vegetable oil
- Simple green cleanser
- Paper towels
Procedures: (5 days)
(DAY 1) Prepratory Exercises: “Walk the Line,” “Blind Partner Drawing,” “Bound Partner Drawing”
- Teacher will introduce students to the theme of “Impressions of Place” by showing impressionistic slides of landscapes in a “traditional style.” Teacher and students will comment on the artist’s skill of observation and how the artists effectively translated what they saw into colored brush marks. Historical background of the Impressionists techniques and intentions will be new for some students.
- Teacher will also show contemporary examples of how both photographers and painters/printmakers have continued to take a “spontaneous” approach to mark making, going with their gut, and “playing with purpose.”
- Teacher will show students some examples of the frottage technique and explain basic vocabulary for this lesson.
- In preparation for the outside preparatory exercises, teacher will assign 10-12 students to a group and assign a group leader. Teacher will instruct the group leader in each of the exercises and they will then lead and instruct their peers through the activity. Each group leader will be responsible for drawing materials (listed above).
- Teacher will explain and demonstrate to the group leaders the first draw
- Teacher will monitor groups while each leader is teaching the group and answer questions as necessary.
- Groups will complete the exercises in the given time allotted and group leaders will return for the next activity instruction. 10-15 minutes will be given for each activity.
- Teacher will designate an area for each group, two markers will be dropped.
- Students will line up in front of one marker facing to the side; one at a time students will begin walking sideways towards the second marker (1 step every 5 seconds or so). As they “side-step” along the path they will quickly draw what they see. The leader of the line should make a U-turn so that their back is to the previous student and continue walking towards the first marker.
- Student’s drawings will look like a horseshoe. Each round should take 3-5 minutes and can be repeated a few times (each time with a new paper) within the 10-15 minute time allotted.
Guiding Questions may include:
- What was your experience of each exercise, how did you feel doing each activity?
- How were these exercises different from your previous experiences with landscape or observational drawing?
- What did you learn through doing these exercises?
- Why do you thing your teacher hoped you would learn, what was the purpose of these exercises?
Instructions for “Blind Partner Drawing”
  |
 |
- For this activity group members should choose partners. One person will put a blindfold on.
- The un-blindfolded partner should safely walk a few steps to another area of campus and select and object.
- Without naming the object, the sighted partner will describe to the blindfolded partner how to start the drawing; paying close attention to locating the mark on the page, the direction of the line or mark, and the quality of the line or mark.
- Partners should take turns and/or complete more than one drawing in the time allotted.
Instructions for “Bound Partner Drawing”
- For this activity partners should stay the same as for the previous exercise. Partners will use the blindfold to bind their wrists/hands together- preferably their dominate drawing hands.
- With tension between the pairs, students will quickly draw (on the same page) what they see before them.
- Variations of the bound drawing may include, but are not limited to: behind the back drawing, or double bound and double drawing utensil combinations.
(Day 4-6) *Note it may be helpful to split the class into groups so that work time alternates between printing, fixing Yupo prints and assisting/clean up.
- Students will post a few of their drawing from each exercise, while teacher will sets up the demonstration(s) for the direct drawing and frottage rubbing techniques (materials list above.)
- Referencing the student’s drawings posted from the previous day’s exercises, the teacher will work quickly to model the spontaneous and improvisational style.
- Rolling out a thick black ink slab on the table, placing a paper lightly on top, covered with wax paper and newsprint- taped on one edge to create a hinge.
- Teacher will show how to peak at the image without changing the registration, when the image is “complete” or has a sense of “resolve” teacher will remove the print and place on the drying rack.
- Yupo paper will be placed on top of the altered ink slab, followed by wax paper. With fingers or a baren, the teacher will rub on the back side of the wax paper- being careful not to rip the paper, working carefully form one side to the other and repeating in various directions.
- Once the frottage rubbing is complete the Yupo paper can be altered- ink smeared or marks dragged though the ink.
-Use 4 loops of paper to stick the Yupo paper inky side up onto the table.
-Sprinkle the surface with Talk powder and spread into the inky surface with a dry brush.
-Pour a small amount of Gum Arabic directly on the inky surface, lightly wipe, multi-directionally with a damp sponge.
-Rinse out the sponge and wipe off excess Gum Arabic and place print on the drying racks.
(step 3)
- Go back to original ink slab and alter the state, flip over stencils, add more ink, etc. Place a final piece of paper onto the slab, followed by wax paper and newsprint (with a tape hinge).
- Draw back into the paper, creating more marks and altering the original ink slab. This would be a good stage to introduce some chance effects like- collaboration with a peer, bound partner drawing, or rotating student work stations
Closure:
After all printing groups have had a chance to print 3-4 images students will fill out the self-evaluation based on their own work and assemble their process work (preparatory sketches) for grading. Students will engage in a short discussion connecting their experience outside observing their "Impressions of Place" with the final results of their frottage prints.
Guiding Questions may include:
Assessments:
Formative- Teacher will monitor students during ‘pre-exercises’ to make sure students are engaged in spontaneously recording their observations and visual impressions.
Summative- Students will grade themselves based on the self-assessment (40 points scale - 10 points each for meeting the criteria, good craftsmanship, effort & invlolvment, and creativity & origniality- taking it beyond the basics). The rubric was given at the start of the project. Teacher will grade the completed project based on the given criteria.
Extensions:
The teacher could set up a blog where students would contribute their found drawings and “Impressions of Place.” A found drawing is essentially a photograph of an abstract (cropped or zoomed in) readymade drawing; something unaltered and interesting. Students could photographically record their journey from home to school (25 or so images) which would compile a photo essay or photo journey (for example: http://impressionsofplace.blogspot.com/).
Specific Links:
http://summerprintmaking.blogspot.com/search/label/Frottage
Impressions of Place (blog): http://impressionsofplace.blogspot.com/
After all printing groups have had a chance to print 3-4 images students will fill out the self-evaluation based on their own work and assemble their process work (preparatory sketches) for grading. Students will engage in a short discussion connecting their experience outside observing their "Impressions of Place" with the final results of their frottage prints.
Guiding Questions may include:
- How did the initial preparatory sketches alter your ideas about the space around you and inform your final prints?
- What did you notice (from looking quickly) at your environment that you had never seen before?
- How did collaborating and or working in a small group affect the success or difficulties of these prints?
Assessments:
Formative- Teacher will monitor students during ‘pre-exercises’ to make sure students are engaged in spontaneously recording their observations and visual impressions.
Summative- Students will grade themselves based on the self-assessment (40 points scale - 10 points each for meeting the criteria, good craftsmanship, effort & invlolvment, and creativity & origniality- taking it beyond the basics). The rubric was given at the start of the project. Teacher will grade the completed project based on the given criteria.
Extensions:
The teacher could set up a blog where students would contribute their found drawings and “Impressions of Place.” A found drawing is essentially a photograph of an abstract (cropped or zoomed in) readymade drawing; something unaltered and interesting. Students could photographically record their journey from home to school (25 or so images) which would compile a photo essay or photo journey (for example: http://impressionsofplace.blogspot.com/).
Specific Links:
http://summerprintmaking.blogspot.com/search/label/Frottage
Impressions of Place (blog): http://impressionsofplace.blogspot.com/
Lesson 3 Presentation Slides: Click on the image to view its original source
Click below to download Lesson 3 design development and asessment rubric
| lesson3_criteria.pdf |