LESSON 4: Knowing the World Through Touch, Collagraphic Prints- found textures on cardboard printed with water based inks on heavy paper
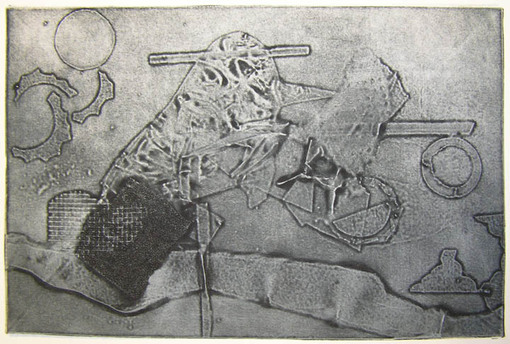
Karissa Ferrell, Resemble Re-assemble, 2011 Mixed media collagraph print
Description:
With this lesson students will create a mystery object for their peers to discover through touch. Students will use their preparatory sketches to create a plate using a collagraph technique. Students will print their plate using a variety of methods including tonal hues, ghost prints, and viscosity printing. Students will work collaboratively in printing groups on the printing press.
Objectives:
Artists' Examples of
- Maggie Ayres, Various mixed media and textile works
- Roland Flexner, Untitled works, Sumi Ink on Paper
Defining Terms:
Collograph- a type of print made from cardboard and other found materials and textures
Texture- (implied and actual) Actual Texture in the surface quality of an object as perceived through the sense of touch. Implied Texture gives the appearance of a perceivable texture, your mind is fooled into thinking the surface is rough or spiky when it is actually smooth.
Value- The range from black to grey to white tones within an image. Often a range of values are used to give the illusion of light falling on an object, giving the object an illusion of form.
Viscosity Printing- A multi-color printmaking technique that incorporates principles of relief printing (raised areas) and intaglio (incised details). With this printing technique various thicknesses and colors of ink are both rubbed into incised or scratched details and rolled over the relief surface of a plate to create the effect of multiple runs on the press.
Relief Printing- A print made by carving away unwanted areas and rolling ink onto the surface of the plate. The raised areas transfer the ink whereas the recessed areas remain the color of the paper (no ink is transferred).
“Mood” or “Feeling” of an Artwork- When discussing works of art, the term “mood” refers to the kind of emotion an object suggests to the viewer.
Materials and Procedures: *T.A. Will be needed to help prepare materials and extra mystery objects in case a student forgets
Preliminary Exercises:
Collograph plate making materials:
Printing materials:
Etching ink: tones of black- blue, red, yellow
Procedures: 7 days (alternating 2-3 printing groups)
(DAY 1) preparation exercises: in preparation students will pair up with someone they choose to work with throughout this process. Students will each create a mystery object for their peers to discover through touch.
1. Teacher will explain the preparatory exercises to the students
2. Students will exchange mystery objects (concealed in a brown paper lunch bag) with a partner.
3. Students will reach into the bag and begin to feel the mystery object. Without looking they will attempt to draw the contour edge of
the object, from different points of view.
4. Students will then attempt a realistic drawing of the object considering how to translate the feeling of actual textures into implied
textures on their drawing.
(Day 2-3)
1. Following the teacher’s demonstration, students will begin creating a collograph plate which re-creates and translates the textures, shapes, forms and contours of their “mystery object” into the textures on their collograph plate.
(DAY 4-7)
1. Teacher will demonstrate how to prepare a “wet pack” of paper and how to ink, wipe and print their collograph plates using etching ink
and tarlatin.
2. Teacher will also demonstrate proper printing techniques on the press and proper cleaning procedures.
3. In printing groups (one group will be inking/printing, another group will be assisting by managing wet paper, the presses and the
prints, and the third group will be assisting with clean up and anything else needed by the students who are printing). Printing groups
will rotate roles daily until each student has printed 3-4 images.
4. Students will begin printing their plates using a variety of techniques: tonal shades of black ink, a “flat” underneath a tonal layer, a
ghost print of their previous image, and or rolling a different color on top using the viscosity method.
5. Teacher will monitor student’s use of ink and printing technique to make sure students are not overly wasteful or getting frustrated by
the process.
Closure: (DAY 8)
Students will lay out their prints from this lesson and the previous lesson. Students will have an informal critique/discussion making connections between feeling and the sense of touch and the mood or feeling of the artworks. Students should wander around looking at each other’s work, they may naturally gravitate towards specific works or the teacher can hold up works to spur on conversation.
Some questions may include: *Students will be encouraged to use descriptive adjectives, poetic metaphors and/or stirred memories to explain how the work makes them feel.
- When you look at the artwork, does it make you feel calm, anxious, afraid, sad, happy, excited?
- What types of colors, lines, textures, and shapes has the artist used? How do those choices relate to the feeling or mood
created in the artwork?
- How could you change the mood of this work?
- Do you think the artist internally felt the same way the image appears?
- Who has a different interpretation of the mood or feeling of this work? What makes you feel that way about it?
- Create a title for the work of art that represents its mood.
Assessments:
Formative-Teacher will monitor student’s progress and understanding of the collograph
technique.
Summative- Students will participate in a short discussion/critique of the works. Teacher will get a sense for the student’s
deeper understanding of the process and the connections between mood/feeling/emotions and textures and how they can
create a sensory translation within artworks. Students will also grade themselves based on the self-assessment (40 points scale - 10 points each for meeting the criteria, good craftsmanship, effort & involvement, and creativity & origniality- taking it beyond the basics). The rubric was given at the start of the project. Teacher will grade the completed project based on
the given criteria.
Extensions:
Students could participate in “assignment #11” from the Creative Core blogspot: Creating Mood in Artworks.
http://thecreativecore.blogspot.com/2008/08/assignment-11-creating-mood-in-our.html
Specific Links: (influences and resources for critique questions)
http://thecreativecore.blogspot.com/2008/08/assignment-11-creating-mood-in-our.html
YALE UNIVERSITY ART GALLERY, Writing about Art: What’s the Mood?
http://artgallery.yale.edu/pdf/academic_res/web_yuag_activitymood.pdf
Student Examples>>
Proceed to Lesson #5 >>
<<Return to Semester Overview
With this lesson students will create a mystery object for their peers to discover through touch. Students will use their preparatory sketches to create a plate using a collagraph technique. Students will print their plate using a variety of methods including tonal hues, ghost prints, and viscosity printing. Students will work collaboratively in printing groups on the printing press.
Objectives:
- Each student will create a unique object and have the opportunity to explore their peer’s unique object using their sense of touch.
- Students will translate their perception of touch into creating a mixed media collograph plate.
- Students will print their collograph using 3 or more unique methods.
Artists' Examples of
- Maggie Ayres, Various mixed media and textile works
- Roland Flexner, Untitled works, Sumi Ink on Paper
Defining Terms:
Collograph- a type of print made from cardboard and other found materials and textures
Texture- (implied and actual) Actual Texture in the surface quality of an object as perceived through the sense of touch. Implied Texture gives the appearance of a perceivable texture, your mind is fooled into thinking the surface is rough or spiky when it is actually smooth.
Value- The range from black to grey to white tones within an image. Often a range of values are used to give the illusion of light falling on an object, giving the object an illusion of form.
Viscosity Printing- A multi-color printmaking technique that incorporates principles of relief printing (raised areas) and intaglio (incised details). With this printing technique various thicknesses and colors of ink are both rubbed into incised or scratched details and rolled over the relief surface of a plate to create the effect of multiple runs on the press.
Relief Printing- A print made by carving away unwanted areas and rolling ink onto the surface of the plate. The raised areas transfer the ink whereas the recessed areas remain the color of the paper (no ink is transferred).
“Mood” or “Feeling” of an Artwork- When discussing works of art, the term “mood” refers to the kind of emotion an object suggests to the viewer.
Materials and Procedures: *T.A. Will be needed to help prepare materials and extra mystery objects in case a student forgets
Preliminary Exercises:
- For homework each student will create an "unusual object" from 5 or more things they find at home.
- Brown paper lunch bags
- Pencil (mark making materials)
- Drawing paper
Collograph plate making materials:
- Cardboard 6x9 inches (excess chipboard from portfolio covers is perfect)
- Contact paper two sheets per student (one to cover cardboard plate the other to cover objects on the plate)
- Low relief materials such as: masking Tape, painter’s tape, drywall tape, string or thread, crumpled paper, packing materials, bubble wrap, corrugated cardboard, & glue beads
- Scissors or x-acto knife
Printing materials:
- Printing paper Reivs BFK 4 per student
- Tub of clean water for soaking
- Clean towels for bloting paper
- Bookmaking bone tear
- Printing press
Etching ink: tones of black- blue, red, yellow
- Blank plates for prining "flats"
- Tarlatin, for wiping the plates
- Relief ink, for rolling on top
- Varnish-mixing appropriate ink consistencies
- Ink knife
- Printing press
- Newsprint
- Brayers
- Rubber or cardboard ink spreaders
- Clean up: Ink scrapers, phone book, vegetable oil, simple green, paper towels
Procedures: 7 days (alternating 2-3 printing groups)
(DAY 1) preparation exercises: in preparation students will pair up with someone they choose to work with throughout this process. Students will each create a mystery object for their peers to discover through touch.
1. Teacher will explain the preparatory exercises to the students
2. Students will exchange mystery objects (concealed in a brown paper lunch bag) with a partner.
3. Students will reach into the bag and begin to feel the mystery object. Without looking they will attempt to draw the contour edge of
the object, from different points of view.
4. Students will then attempt a realistic drawing of the object considering how to translate the feeling of actual textures into implied
textures on their drawing.
(Day 2-3)
1. Following the teacher’s demonstration, students will begin creating a collograph plate which re-creates and translates the textures, shapes, forms and contours of their “mystery object” into the textures on their collograph plate.
(DAY 4-7)
1. Teacher will demonstrate how to prepare a “wet pack” of paper and how to ink, wipe and print their collograph plates using etching ink
and tarlatin.
2. Teacher will also demonstrate proper printing techniques on the press and proper cleaning procedures.
3. In printing groups (one group will be inking/printing, another group will be assisting by managing wet paper, the presses and the
prints, and the third group will be assisting with clean up and anything else needed by the students who are printing). Printing groups
will rotate roles daily until each student has printed 3-4 images.
4. Students will begin printing their plates using a variety of techniques: tonal shades of black ink, a “flat” underneath a tonal layer, a
ghost print of their previous image, and or rolling a different color on top using the viscosity method.
5. Teacher will monitor student’s use of ink and printing technique to make sure students are not overly wasteful or getting frustrated by
the process.
Closure: (DAY 8)
Students will lay out their prints from this lesson and the previous lesson. Students will have an informal critique/discussion making connections between feeling and the sense of touch and the mood or feeling of the artworks. Students should wander around looking at each other’s work, they may naturally gravitate towards specific works or the teacher can hold up works to spur on conversation.
Some questions may include: *Students will be encouraged to use descriptive adjectives, poetic metaphors and/or stirred memories to explain how the work makes them feel.
- When you look at the artwork, does it make you feel calm, anxious, afraid, sad, happy, excited?
- What types of colors, lines, textures, and shapes has the artist used? How do those choices relate to the feeling or mood
created in the artwork?
- How could you change the mood of this work?
- Do you think the artist internally felt the same way the image appears?
- Who has a different interpretation of the mood or feeling of this work? What makes you feel that way about it?
- Create a title for the work of art that represents its mood.
Assessments:
Formative-Teacher will monitor student’s progress and understanding of the collograph
technique.
Summative- Students will participate in a short discussion/critique of the works. Teacher will get a sense for the student’s
deeper understanding of the process and the connections between mood/feeling/emotions and textures and how they can
create a sensory translation within artworks. Students will also grade themselves based on the self-assessment (40 points scale - 10 points each for meeting the criteria, good craftsmanship, effort & involvement, and creativity & origniality- taking it beyond the basics). The rubric was given at the start of the project. Teacher will grade the completed project based on
the given criteria.
Extensions:
Students could participate in “assignment #11” from the Creative Core blogspot: Creating Mood in Artworks.
http://thecreativecore.blogspot.com/2008/08/assignment-11-creating-mood-in-our.html
Specific Links: (influences and resources for critique questions)
http://thecreativecore.blogspot.com/2008/08/assignment-11-creating-mood-in-our.html
YALE UNIVERSITY ART GALLERY, Writing about Art: What’s the Mood?
http://artgallery.yale.edu/pdf/academic_res/web_yuag_activitymood.pdf
Student Examples>>
Proceed to Lesson #5 >>
<<Return to Semester Overview